Sunday, January 1, 2012
I Really Did Try
Thursday, December 1, 2011
If You’re In France, Is It Still Called French Onion Soup?

I adore ordering French Onion Soup Gratinée on the rare occasion when we go out to eat at a nice restaurant. My love of FOSG came from childhood when we’d go to fancy restaurants and I felt oh so grown up ordering it! The problem is, rarely do I get what I ordered these days. What comes looks like FOSG but once I dig through that beautiful lid of browned and bubbled cheese, I am left disappointed by the salty, brown, usually flavorless broth filled with strands of onions underneath. What’s a girl to do? Learn to make her own of course!
I started by going straight to the master, or in this case mistress, of French cuisine, Julia Child. I liked the soup it produced but it was missing the depth of flavor from my childhood memories. Then I tried Alton Brown’s recipe and again, I liked the soup it produced but it was too much sweet, not enough savory. After trial and error took place several times, I finally hit upon the perfect soup by combining the two recipes.
FOSG is a labor of love and one of those soups that tastes BEST the day or two after it is made. I use sweet or yellow onions but NEVER Vidalia Onions (because they are just too sweet for this dish). I use Beef Stock, NEVER Consommé which is a soup in its right, typically is made by adding a mixture of ground meats, together with mirepoix, tomatoes, and egg whites into either bouillon or stock that is simmered for a very long time during which, if done right, the soup is clarified. It is a clear soup and wasted in this recipe. Most important in this recipe is that you use ingredients you know you like the flavors of and adjust the soup to your personal liking.
4 lbs onions, peeled and sliced –I prefer yellow, sweet or a combination
2 T olive oil
2 T butter
salt
1-2 T sugar (optional)
2 T flour
½ t dried thyme
pepper to taste
1 ½ C apple cider or pressed apple juice
2 C dry white wine
2 nips cognac
6 C beef stock
2 cloves of garlic peeled & smashed
Peel and slice 4 pounds of onions. If you only have access to Vidalias, I suggest using 50/50 with yellow onions. I do not like white or red onions in my soup but if you like it, go ahead and use those. Uniformity of slicing is not important. You do not want them paper thin, nor do you want ½ inch thick slices, I find about a ¼ inch thick slice works best. I prefer to use a large skillet to caramelize the onion slices, I feel it works better than attempting to do it in the soup pot because it allows for better evaporation of the liquid the onions give off during this part of the process. Remember, you are cooking 4 pounds of onions all in one pan!
It takes a good 45 minutes to an hour to cook the onions. I place my skillet over medium heat, allow it to warm up then put my olive oil and butter in, once the butter melts I add all the onions and salt them liberally. It takes about 10-15 minutes for the onions to break down enough so you can stir them around. After than initial stirring I leave them alone in 20 minute increments to do their thing, stirring each time the timer goes off. In fact, during the long cooking period, I go do other things so I am not tempted to stir, poke or mash the onions.
I do not take my onions to a deep mahogany brown but rather a light caramel. If they “burn” it’s not a disaster but I just prefer them this way. If you are having trouble getting your onions to caramelize, sprinkle them with a tablespoon or two of white sugar and that should solve the problem. If they caramelize well on their own, I skip adding the sugar.
Once my onions are at the proper color, I sprinkle the flour, dried thyme & a few twists of black pepper over them, stir it in and kick the heat up to high and when the onions get a little darker & the flour disappears (about 1 minute) I add one cup of wine and stir constantly, scraping up the bits on the bottom for about 2 minutes or till you have a thick syrupy mass in the pan. I pour the mixture into my soup pot, if the skillet isn’t totally clean, don’t panic we’re going to take care of that. Add about 1 cup of the beef stock to the soup pot and stir well. This is a good time to point out that this is NOT a thick soup, the flour helps to create a silky mouth feel.
Now that it’s empty Keep your skillet on the high heat and use 1 1/3 cups of the apple cider/juice to deglaze the pan all the way. Cook and stir the juice for about 2-3 minutes, once the pan is completely deglazed, you are looking for a 50% reduction in the juice but not a thick syrup which can happen in the blink of an eye if you are not paying attention. Dump the contents of the skillet in the soup pot followed by the rest of the stock, 1 nip of cognac and another cup of wine. Drop in the 2 cloves of garlic and set the pot to simmer uncovered for about 2 hours, stirring occasionally. If you were to taste the soup at this point, it will be very weak, almost watery. Slow simmering will take care of that.
At the two hour mark is when I generally start tweaking the flavors. I like to develop a nice rich soup, not too sweet. I have simmered this soup as long as 4 hours to get the flavor I want. If I am close and not serving the soup till the next day, I pop it in the fridge and tweak it again as I heat it up the next day.
Tips to adjust the flavor:
Not sweet enough? Add more cider/juice
Not savory enough? Add the other nip of cognac
Missing that acidic twang? Add more wine.
Did it reduce too much? Add more stock.
Of course you can adjust salt and pepper but be careful with the salt, especially if you are making this ahead as the salt will develop more over night.
For serving I top my ovenproof crocks of hot soup with garlic "croutes" that I also make the day before. ¼ - ½ inch slices of French bread, dressed in olive oil baked at 325* on a sheet pan for 15 minutes a side. While still hot and toasty I rub one side of each toast with a clove of garlic. It’s also yummy using pumpernickel or seedless rye bread! I float two on the top of the soup and cover with an ample amount of Gruyere and Mozzarella cheeses and put under the broiler till the cheese is melted and bubbly and brown but not burnt. Alternatively you can float croutons on top to cover with cheese but put enough in to create a shelf. If you use the croutons, you can use a mix of all the breads I mentioned above (heaven!!!)
Tuesday, May 24, 2011
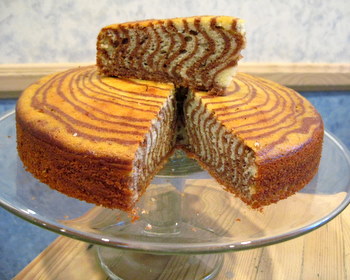
Better Late Than Never.... Pink Zebra Cke

Sometimes I use cake mix, this was one of those occasions. Since I knew I wanted a 3-layer cake, I knew I would have to bake a total of four 9" cakes. I also knew that light, fluffy, airy cake would not hold up to being stacked. So I used my tried & true doctored up cake mix cake. For each two rounds I used:

I know a lot of people are confused about how to layer a zebra cake. It really is as simple as dumping scoops of batter on top of each other. I used ice cream scoops with the thumb release to portion out the batter. One thing I did note is that you need to make sure your prepared pans are on a level surface or the batter will not spread evenly. Also, I used pan release in a can to grease & flour my pans and it worked like a charm!

The first batch of cakes I made I did not measure out two cups of batter to tint, I eyeballed it and as a result had too much pink and not enough white batter. You can see it in the middle layer of the finished cake. If you want perfect zebra stripes, you need to make sure your scoops hold the same amount of batter. You also need to be mindful to dump each scoop of batter in the middle of the the last scoop of batter you dumped in.

After the cakes come out of the oven, cool them for 15 minutes before removing them from the pan. Then allow them to cool on racks until they are completely cool. Wrap them well in plastic wrap and stash them in the fridge to get cold before leveling, filling and frosting.
Saturday, May 21, 2011
I Am A Tease
Tuesday, May 17, 2011
If It Has No Sugar, No Dairy & No Gluten, Is It Still Dessert?
A note about the prepared crust. If you don't need gluten free you can use any store bought shortbread crust you want. If you need gluten free you may have to make your own by crushing up some gluten free shortbread and mixing it with melted margarine.
Monday, May 16, 2011
Better Than Take Out

T-minus three days and counting till the birthday caking begins so I thought I would share another recipe I made over the winter. It's no secret that we do not eat out very much and even that is an understatement. If we eat takeout twice a year that's a lot for us but we kept seeing commercials for the Olive Garden's Vino Bianco Pork Scallopini and it looked so yummy! The problem is, neither one of our stomachs do well at Olive Garden. Yeah it tastes good going in but an hour later both of us have tummy aches and rumbles and well, you get the idea. I figured that I could make a reasonable facsimile here at home that tasted great, was less expensive and more easily digestible by our finicky tummies.
Tortellini With Spinach & Mushrooms
1 package frozen Cheese Tortellini, cooked & drained
4 T butter
8 oz sliced Crimini Mushrooms
4 cloves garlic, minced
1 C white wine or chicken stock
1 C half & half
4 T Parmesan Cheese, grated
1 lb bag frozen leaf spinach, thawed and well drained
Melt butter over medium heat then add mushrooms, stir to coat with butter. Allow mushrooms to cook for 1-2 minutes then add garlic. Cook over medium heat for about 5 minutes, stirring frequently. Raise heat to high, continue to stir and when you begin to see brown bits on the bottom of the pan dump in all the wine and stir to deglaze. Bring to a hard boil and allow to boil for about 3 minutes or until slightly reduced. Add cream all at once, bring to a boil again and continue to stir while mixture reduces about 4 minutes. Lower heat slightly, add cheese and continue stirring and cooking until sauce coats back of spoon. Remove from heat and stir in spinach and tortellini.
Sunday, May 15, 2011
While You Wait For Cake, Eat Pork
I came up with a ripoff recipe for Olive Garden's Pork Scallopini (I will post recipe at some point). The side dish is tortellini with spinach and crimini mushrooms! I made this on one of the long, snowy weekends we survived up here. It was a huge hit!The crock-pot recipe I use for pulled pork is easy but takes around a total of 18-20+ hours. The first round of cooking takes 12 hours on low and it’s during this twelve hours that the real magic takes place. If I want to serve this for Saturday supper I start my crock-pot around midnight Friday. Slice a sweet onion, smash 5 cloves of garlic and put in the bottom of the crock, put the meat in next (I use either a “Picnic Shoulder” or a pork butt), pour 1 cup of a not too sweet ginger-ale (I like Canada Dry) over all, salt and pepper liberally and top with another sliced onion. Do not, do not, do not open the crock-pot lid for 12 hours (hence why I let it cook overnight).
When you hit the 12 hour mark open the crock and check the meat with a fork if it starts to fall apart you are good to go, turn off the crock. Remove the meat, onions and garlic into a 9x13 pan. I use a gravy separator to remove the fat from the cooking liquid and then put most of the juice back in the crock along with the cooked onions and garlic, the pork that I shredded with 2 forks, a freshly sliced sweet onion and about a cup and half of my favorite BBQ sauce (I like Sweet Baby Ray’s). Plop the lid back on and cook on low for 6-8 additional hours or until it’s tender. During the last 6-8 hours I do remove the lid and stir it, check to make sure there is enough liquid and sauce and occasionally I end up turning my crock-pot down to the lowest setting.
Trust me when I tell you that it is moist and tender and tasty. If it’s not, you did something wrong!
Saturday, May 14, 2011
I'm Back & There's Going To Be Cake

Saturday, November 27, 2010
Tradition Smells Like Gingerbread

We have a gifting tradition where we pass this horrible, silver, laser cut dragon pendant back and forth. It started the year Sandy bought it for Mike, after I told her not to waste her money. There are rules;
Never Enough Time
Monday, April 26, 2010
Saturday, April 3, 2010
Oh Carrot Where Art Thou?
Many of the recipes I looked at were not actual carrot cakes, they were quick breads or muffins with a little bit of carrot and a ton of sugar baked in a cake pan and frosted with cream cheese icing. Carrots are naturally sweet and masking them under piles of sugar seemed wrong to me. Also, if I wanted carrot bread I would just make carrot bread. I wanted cake. Too many of the recipes called for extended mixing times AFTER the flour had been added. Hello! I want cake, not bread and over mixing causes gluten production, which makes bread.
So I started with what I knew… I knew I wanted carrot to be the star player and not merely an add-in. I knew I wanted walnuts but no raisins or coconut. I knew I didn’t want to taste vegetable oil or end up with a heavy brick that sat in my stomach hours after consuming it. I knew I wanted it moist, flavorful and decadent just like my Gram used to make. The last thing I should mention is that I ultimately decided on cupcakes instead of a 9x13 or layer cake. Why? Just cuz, that’s why. I gathered my ingredients and hit the kitchen…
You’ll notice a few things different about my version of carrot cake, most notably (I think) the absence of vanilla and a significant reduction in sugar and oil. I love vanilla. Vanilla is my friend. Vanilla has no place in this cake. Vanilla would be wasted in this cake. The cinnamon and ginger are such strong players that they would completely swallow 1 or 2 teaspoons of vanilla. Save the vanilla for the frosting. There is no white sugar in this cake. The frosting has more than enough white sugar in it to satisfy the sweetest of sweet-toothed people. I used a combination of brown sugar and unsweetened, crushed pineapple and its juice to sweeten the cake. I swapped out most of the oil for plain yogurt. Lastly, I used salted butter because that’s what most people have on hand. What did all of this produce? Actual cake. Carrot cake where you could see the carrots, walnuts and pineapple in the finished product. Cake that feels like cake in your mouth not bread. Cake that is savory and slightly sweet and yummy and a perfect vehicle for cream cheese frosting!
Carrot Cake
2 c Walnut halves and pieces or halves, your choice, toasted, cooled and chopped to size
1 lb of carrots, peeled and grated
2 ½ c AP flour, I prefer King Arthur
½ t salt
1 t baking powder
1 t baking soda
2 t cinnamon
½ t freshly rasped ginger (use 1 t if powdered)
¾ c brown sugar
½ c melted salted butter
¾ c + 2 T plain yogurt
3 eggs
8 oz crushed, unsweetened pineapple in juice, drained- reserve juice
2 T of the reserved pineapple juice
1 recipe Creamy Cheesy Cream Cheese Frosting
Pulverized, toasted walnuts for garnish optional
I started by toasting walnuts and yes, it’s worth the extra step. I had a one-pound bag of walnut halves and pieces. I toasted half of the bag on an un-greased cookie sheet in a 350* oven for 10 minutes while I peeled and grated a pound of carrots on the larger side of my box grater (yes it matters, the smaller side turns them to mush). I ran my knife through the walnuts to make them the size I wanted, which is to say in small chunks.
In a large bowl whisk together the: flour, salt, baking powder, baking soda, cinnamon and ginger. Using your hands, toss the carrots and nuts into this mixture. You really need to do this part with your hands to ensure that everything is evenly distributed and the carrots are well coated with the flour. By tossing the ingredients at this stage, you don’t end up developing gluten by over mixing once the wet ingredients are added.
In a separate bowl beat together the oil, yogurt and sugar until smooth and no traces of sugar remain. Add the eggs one at a time, beating well after each addition. Stir in the pineapple. Pour this mixture over the flour and stir just until combined. I found my mixture to be a little too thick at this point and added 2 T of the reserved pineapple juice.
I used my handy-dandy ice cream scoop to portion out the cupcakes (this recipe made 2 ½ dozen). Bake at 350* for 18 minutes, allow them to cool in the pan for a few minutes before removing them to a wire rack to cool completely. You could easily bake this in any cake pan you wish.
Creamy Cheesy Frosting*
8 oz cream cheese, room temp.
1 stick of salted butter, room temp
1 lb box Confectioner’s/10x sugar
2 t vanilla extract
1 t lemon juice
I start by creaming the cream cheese and butter together in my kitchen aid. Once they are mixed and smooth I add the sugar and flavorings. I start on the "Stir" setting so I don't get covered in powdered sugar and then kick it up to 8 and let it go for 5 minutes. Too thick? Add about a tablespoon of milk. Too thin? Pop it in the fridge a bit and it will firm up.
I used a Wilton tip for the frosting swirls and toasted, pulverized walnuts to finish them off. There are a few tips I can give you that I find help me immensely. Before I start frosting I divide the cupcakes into 2 pans that are sturdy enough to be able to carry over to the fridge. When using tips to frost I find that in addition to the soft consistency of the frosting, holding the tip directly over the cupcake and NOT at any kind of angle gave me the best look. I frosted 4 at a time and then stopped to pat on the walnuts. When one pan was done it immediately went into the fridge to firm up. Firming up the frosting BEFORE transporting is the key to your cupcakes arriving as beautiful as they were freshly frosted in your kitchen.
*Squirrely wrath!
Monday, February 15, 2010
Sabbatical Over
Greetings to anyone left reading my blog. I would apologize for being away so long but in truth I am not at all sorry that life has been so busy that I haven't had the time to blog. The 2009 holiday season was a blast! We had such an excellent time filled with friends, food and lots of laughs. Some time in the next week I will post about the gingerbread house we made as a gift but today I wanted to announce the addition of a new family member and sing the praises of a company that I just could not live without! This is Diamond, although we call her DD for short. While we've know her for a few months, she officially came to join our household a little over a week ago.We had a little notice that she was coming and we also had known that there had been a little flea problem where she was living. I won't lie, I was a little panicked because originally we had discussed meeting at a grooming shop and that wasn't going to be able to happen. No problem, I am adaptable, so I called my friendly groomer who reminded me that Bobbi Panter makes a great flea and tick shampoo. Only one problem, I called over a dozen shops and no one had a bottle of Charlie Dog for us. What's a girl to do? I called Bobbi after 5:00 my time, on a Thursday night and left a message. Bobbi called me back in about 20 minutes and promised me that she would find a way to get a bottle of Charlie Dog into my hands before DD got here and Bobbi lived up to her word!
I have loved Bobbi Panter products since I was first introduced to them a few years ago. Her Itchy Dog shampoo was the only shampoo we used on our beloved Jack up until he passed away last year. Jack had some pretty serious skin issues from allergies and Itchy Dog would take the red and heat right out of his skin on contact. But it's not just that I think* Bobbi Panter's product are amazing and have seen them work wonders, it's the fact that Bobbi herself stands behind each and ever bottle of product. I know this because about a year before Jack passed we purchased a bottle of Itchy Dog from Pet Co and I wasn't happy with it at all. I literally had a nutty because the product just seemed off to me. In my passion to ensure that Jack only got the best I shot off a rather angry missive to Bobbi Panter and was shocked when she not only personally replied to me but did everything in her power to make it right for us. I became a fan of her personally and her company in addition to already being a fan of the shampoo line!
True to my other experiences with Bobbi Panter product, Charlie Dog did not disappoint. Unlike other chemical filled shampoos this had a great scent and left DD's coat so soft and smooth. We couldn't get over how great the product smelled int he bottle and how good DD smelled and continues to smell. It also appears to have significantly lessened DD's itchy skin as we have noticed a decrease in scratching and licking. Bobbi Panter has another win on her hands with Charlie Dog and we see it being a summertime staple in our house for regular grooming when we spend lots of times outside!
Thank you Bobbi!
*For the record this is an unsolicited and unpaid for review of Bobbi Panter products. I received no incentive for writing this review.
Friday, September 4, 2009
Best Birthday Cake Evah!
It's chocolate. It's peanut butter. It's cake. What's not to love?
Chocolate, chocolate chip cake, peanut butter cream cheese frosting and chocolate peanut butter ganache! OMG! So rich. So good. Requires lots and lots of cold milk!
I can't lie ... I adapted the recipe from Smitten Kitchen. It's not as pretty as hers but damn it was goooooooooooooooooooooooood!
The changes I made were small. I used my own cake recipe and only made 2 layers. I also added a bit of salt to the filling/frosting and found that I needed to thin it with a bit of milk. The chocolate peanut butter ganache was hands down the best thing I have ever tasted!
Sunday, August 30, 2009
Boo-ter-fly Cakes

Sometimes I get myself in over my head without even trying. Such was the case with these adorable little cakes made for our little friend Boo. Exactly 7 days before her party her mother and I went over to the bookstore so I could show her Hello, Cupcake! to see if there was anything in there she liked. To my honest shock and surprise there was nothing in the book that tickled her fancy so we moved on to other books, fancier books, more complicated cakes. In the end we settled on a combination of the butterfly cupcakes from Hello, Cupcake! (with modifications) and a mini-cake from Mich Turner's book Spectacular Cakes. While the cakes would be labor intensive they weren't really all that complicated, especially if I started them three or four days before they were needed for the party. What I didn't count on was an entire week of whatever could go wrong, would go wrong (including me getting a migraine that just wouldn't quit).
The plan was that the mini cakes would be french vanilla, filled with soft pink buttercream, covered in poured fondant of pale green, striped with thin lines of pale pink and magenta buttercream and topped with a pastel colored butterfly. They needed 36 little cakes for their party. In order to ensure that I would have enough I decided to go with cupcakes thinking I would use a timbale mold/cutter to make them all uniform. Due to time constraints, I used french vanilla cake mix that I doctored up with a box of instant pudding and some vanilla extract. The cakes were soft and dense and yummy! However the timbale mold/cutter I bought was 1 size too big and I was unable to make them all completely uniform. Not a problem for cupcakes but for sure a problem when you're going to be coating them with poured fondant. Next time I will make sheet cakes and cut the cakes out to ensure uniform cylinders and save myself the headache when it comes time to coat them. The cakes looked like little light green Ring Dings (or Ding Dongs depending on where you grew up) but tasted amazing!
I used my go-to vanilla buttercream for the filling and butterfly bodies. Man I love that stuff ... it's just everything you want and need a buttercream to be. The pourable fondant however was a COMPLETE disaster! I used the recipe on the King Arthur website. Now, before I go on, I want to remind you guys of my love affair with King Arthur flour. To be fair, it's not that their recipe was a complete disaster, it was a comedy of errors and miscalculations and a migraine that set the whole thing on the road to horrible. We ended up having to scrap the Mich Turner like stripes we had planned on piping onto each cake pre-butterfly because we ran out of time and patience with this project. In the end I don't think it made that much of a difference to anyone but the two of us. Both child and mom were thrilled with the cakes and really that's all that mattered!I had a little accident in the kitchen and I lost 1/2 a pot of liquid fondant to my kitchen floor. I also thought the original coating looked like, well, snot. It was light green and shiny and definitely had an "eeeeeeeeeeeeeeeew" factor. In the end I had to remake the fondant and add a can of ready made frosting to make it opaque (which turned out really well for my purposes) but not before I ended up with a sugar burn on the fingers of my right hand. I used a glass bowl over a pot of simmering water for the second batch and it makes the whole process so much easier as you can regulate the temp as you go. Also, the second time around we chilled and dipped the cakes instead of pouring them. I highly recommend using the dipping method! However, my partner in culinary crimes ended up with sugar burns on his palm when one of the cakes got away from him and instead of letting it fall to the floor he tried to be a hero and save it mid-fall only to have it land top down in his palm. This is not a project to try with the kids in case anyone was wondering. That being said, I have it on good authority that the cakes were a big hit with kids and kids at heart alike! Although, the kids weren't sure what to do with the wings and had to be told they could eat them!
The butterflies were the easiest part of all this and made using Merckens Rainbow Wafer Coatings (in white, pink, purple, blue, peach, yellow and light green) and a hand drawn pattern that eventually was only used as a guide. Once again my creative partner saw potential to put his own stamp on something already pretty cool and he made the wings more monarch-like by free-handing a wing extension. There are detailed directions in Hello, Cupcake! but you really don't need them (buy the book anyway, it really is cool). Just melt some coating or chocolate, draw a butterfly and fill it with a second color of coating or chocolate and then swirl. You should also know that we had to custom blend the Merckens to get these shades by mixing them with white. There are a few tricks and tips, enough so that they will be their own post in the near future.
Assembly was easy and went pretty quick. Just make sure you are not working in a hot kitchen or the wings will get too soft and give you issues. We placed each cake in a pastel cupcake liner, piped on the body and stuck the wings in place. They all sat in the fridge for almost 2 hours pre-transport to make sure the buttercream and fondant were really hard to minimize the potential for transport disaster. I made a cake taker out of a heavy duty plastic soda case topped with a cookie sheet that sat on the edge of the case and wrapped the whole thing in plastic. It worked like a charm and fit in a fridge perfectly! For display at the party I lent them my wire cupcake holder and a silver platter. With a few pretty cupcake papers and some doilies it made for a really neat display! I may try these again at some point, the original version as they were supposed to be .... maybe not. I am such a huge fan of petit fours and to me this was a great updated version of a classic little cake that time has forgotten. Hopefully next time there won't be so much other stuff going on, I won't have a migraine and they will come out as anticipated!
Monday, August 24, 2009
Princess In A Punch Cup

It's almost time for back to school around these parts but not before just one more summer birthday bash! It's a fairytale theme for one of my favorite little princesses, adorable, squishable, kissable "Boo"! Boo's fairytale comes replete with Butterfly Petit Fours (check back soon to see them in all their glory) and pink and purple princess lollies!
For the record there are not made with actual chocolate. Merckens, the white and colored disks we used to make the lollies, is confectioners coating. What's the difference? F.D.A. specifications for chocolate say it must contain chocolate liquor and cocoa butter. While the Merckens wafer coatings contain neither of these ingredients they are good, creamy and most people won't know the difference. We've worked with several flavors and colors of Merckens over the past few months and have had great success with all of them!
I can't say I would make this the first chocolate mold a beginner should attempt. Why? Because this, at minimum, is a three color lollie which means getting down your chocolate painting technique in addition to melting and pouring. We also have to play with paramount crystals because some of the colored wafers were just took thick for such detailed work. Ultimately we did not use paintbrushes to fill in the colors. My partner in crime found that wooden kabob skewers actually worked better and he was able to drop the colors exactly where he wanted. He was also steady enough that he was able to drop all the areas of color without chilling until he was ready to pour but I wouldn't recommend doing it that way. I think slow and steady will win the race for most beginners. Melt and paint or drop one color at a time in your mold then chill before you move on to the next. Also, when choosing your colors, be mindful of how they will play off each other when layered. The lollies back filled with pink left the peach/skin tone unchanged. The lollies back filled with purple made her look like she had a tan. This wasn't a huge deal for this project but I could see it easily becoming one in others.
Another tip I can offer when you are making multiples is to package as they are done. The mold we had made 6 at a time so I had set up a foam holding area/wrapping station while the first batch was in the freezer. I picked up the bags and ribbon at Eatons at the same time I got everything else we needed for this project. Each one got bagged and tied with one of two colors of ribbon and nestled into their final destination which turned out to be a few vintage punch cups I had laying around. I had some opalized basket filler that I lined the cups with, dropped in a small block of Styrofoam, wrapped the long strands of basket filler over the top to hide the foam and then arranged the lollies in the cups. Hindsight being 20/20 and of course if this weren't another party on a budget I would have purchased large bags of pastel jellybeans or M&Ms to fill the cups with before sticking the lollies in. In any event everyone seemed thrilled with the final product and Boo got to have handmade lollies at her party!
Tuesday, August 11, 2009
Chicken Spaghetti
I have three different versions of this sauce, one is exactly how my mother made it, the other is how I make it when I have the ingredients on hand and the third is using raw or homemade ingredients only. Her version uses the pre-made spaghetti sauce only (poured over the browned chicken & simmered for hours) and is pretty good but I think the addition of canned tomatoes, chicken stock and garlic make it so much better. However you make it, this isn't a weeknight dish unless you have extra time on your hands simply because of the time involved in cooling and deboning the chicken that was cooked in the sauce.
1 flat of chicken wings (5-8 lbs is what they usually sell) or 4 chicken leg & 4 chicken thighs
20 cloves of peeled garlic
olive oil for browning
salt & pepper
1 4lb jar of spaghetti sauce
1 large can crushed tomatoes
2 C chicken stock
1/2 C grated Parmesan cheese
In a large stock pot combine the spaghetti sauce, the crushed tomatoes and 1 cup of the chicken stock. Set over medium heat while you prepare the chicken.
Wash the chicken parts, pat them dry and season with salt and pepper. Brown the chicken over medium-high heat in the olive oil, in batches removing the browned pieces to the stock pot. When all the chicken is browned, turn the heat down to medium and saute the garlic cloves until lightly browned (5-10 minutes.) Deglaze the pan with the remaining cup of chicken stock and add it to the stock pot. Stir to combine, cover and simmer for 2 hours or until the chicken is cooked through and basically falling apart.
Remove the chicken sauce from the heat. Using tongs or whatever tool you find works best for you, remove the chicken pieces to a platter leaving as much of the sauce as you can in the pot. Allow the chicken to cool until it can be handled comfortably and then remove the skin and bones returning the meat to the pot. When all the chicken meat is back in the post, stir in the Parmesan cheese and simmer uncovered until the sauce is reduced by about 1/4 and has thickened up.
You can serve this over pasta but my favorite way to eat it is over mashed potatoes with a side of baby peas (that I prefer to make part of the potato mound.) It's a great meal and one of those feel good comfort foods that we all crave from time to time.
Monday, August 10, 2009
Food Cheats: Just Like Tomato Sauce From Scratch
1 jar of Prego Fresh Mushroom Italian Sauce
1 28 oz jar of crushed tomatoes
1 14.5 oz can College Inn Light & Fat Free Chicken Broth
2 cloves of garlic, smashed
1/4 c Parmesan cheese
Meatballs, sausage or other meat optional
In a large saucepan combines all the liquid ingredients, garlic and Parmesan cheese, bring to a boil and then reduce to a simmer uncovered for about an hour. If I am going to add any meat I do it after the hour mark and let it simmer another hour. The longer you let it simmer, the thicker the sauce gets. And just like most other tomato based sauces, it's better the second day.
I use this sauce in everything from simple noodles and sauce to lasagna to stuffed peppers and even in my stuffed cabbage. It's great for subs, homemade pizza and can't be beat when you make it with meatballs. It tastes like you slaved away when all you really did was throw it all in a pot and leave it alone. I've even made this sauce in a crock pot on low and let it go all day while I was out and about.
I've tried it with other brands of sauce and they just don't cook down as well. However, I've changed out the College Inn broth for homemade chicken stock when I've had some on hand and man alive was it good. Play around with your own favorite brands and I'm sure you'll find one that your family will call a winner and dub you Queen Of All Things Yummy for!
Sunday, August 9, 2009
Brioche Sticky Buns
In this house we have huge affection for breakfast rolls. Cinnamon rolls, sticky buns, sweet rolls, orange rolls... Is there anything better with your morning coffee than a fresh from the oven bun? Of course there is! A fresh from the oven bun with a tall glass of cold milk any time of the day! I have my favorite go to for Cinnamon Rolls covered in Cream Cheese frosting (which I will share at some point) but sticky buns have been a favorite of ours long before the cinnamon rolls came into rotation. For years I used a simple scalded milk dough recipe from the 1800s. It was simple and good and fail proof. When we lived in Las Vegas I made more sticky buns that I can remember because baked goods like that didn't exist in any of the shops out there, either did real bagels if you can believe that. The smell that emanated from our apartment brought company by (no matter the hour) wondering what the delicious aroma you could smell on the other side of the complex was. I never thought I would replace that recipe until one night a few months ago when I got it into my head to make them out of brioche.While the dough sat in the fridge chillin' I made the sticky part of the Sticky buns. I melted 1, 4oz. stick of lightly salted butter together with 1 C light brown sugar. Once the mixture melted I added 2.5 oz of light corn syrup (I was out of honey & golden syrup) and set the mixture aside to cool. About 20 minutes later I whisked in 1/4 C half & half and 1/4 C water and stashed the mixture in the fridge until I was ready to form the rolls. The brioche dough really was a treat to work with. Nice and firm, it rolled easily into a 12"x12" square that I sprinkled with 1 C of dark brown sugar and about 2 t of cinnamon before rolling up, slicing into 12 pieces and placing in a 9"x13" glass pan that I had already poured the sticky sauce into.
I left the covered pan on my counter for 90 minutes before placing them uncovered in a cold oven next to a saucepan of boiling water for another 20-30 minutes. I took the rolls out, preheated to 350* and baked them for 40 minutes. Once they were done I left them in the pan for ten minutes, removed them to a serving platter and spooned the remaining sticky sauce on them. They are good and completely worth the time and effort! Plus, when is the last time you had a really good sticky bun that didn't taste like chemicals or cost you $5.00 a piece?
Saturday, August 8, 2009
Party Treats

The cupcake truffles are a variation of the cake-pops we made for June's Graduation BBQ and again the idea comes from Bakerella's blog. Using the same candy mold that made the base for the grad cap, two flavors of cake (left over cupcakes from the gator cake made for the same party), about a cup of cream cheese frosting, two flavors of candy melts (Merkins is my favorite) and the leftover sprinkles from the cake-pops we turned out these little cuties in no time at all. In fact, the only frustrating part was the heat and humidity the week these needed to be made. Just like last time we used the freezer to our advantage!
The candied popcorn idea came from one of my favorite blogs Saucy's Sprinkles! It's candied popcorn flavored with Kool-Aid! In this case we used pink lemonade and black cherry. It's colored with the same Wilton gels you use to tint frosting and friends it's good. I mean crazy good. I mean crack-like addictive good! It's sweet and buttery and "omnomnom" is the only thing you really hear when people get their hands on it. A candy thermometer is a must for this because unlike other kinds of candied popcorn this does not get baked to set the coating! Here's a few tips if you decide to try your hand at candied popcorn:
* 1/2 cup kernels = 12 cups popped corn
* have a partner when you make this, 2 sets of hands are infinitely better than 1
* butter/otherwise grease the pan you are going to mix the coating with the popcorn in and the mixing utensils for easier cleanup
* don't try to make this when it's humid
* a lidded bowl or other food-safe container is perfect for mixing two flavors together and breaking up any large chunks of popcorn that stick together