Showing posts with label party food. Show all posts

Tuesday, May 24, 2011

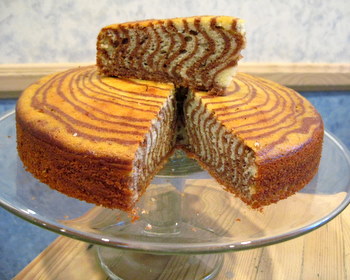
Better Late Than Never.... Pink Zebra Cke


Sometimes I use cake mix, this was one of those occasions. Since I knew I wanted a 3-layer cake, I knew I would have to bake a total of four 9" cakes. I also knew that light, fluffy, airy cake would not hold up to being stacked. So I used my tried & true doctored up cake mix cake. For each two rounds I used:

1 Duncan Hines French Vanilla Cake mix
1 4-serving Jell-O Instant French Vanilla pudding mix
4 large eggs
1/2 C vegetable oil
1 1/4 C whole milk

Follow the directions on the package to mix. Make sure you mix it on the correct speed for the amount of time called for. Once it's mixed, measure out two cups of batter in a measuring cup intended for liquid measure. Tint the 2 cups of batter whatever color you want but make it bold & bright!


I know a lot of people are confused about how to layer a zebra cake. It really is as simple as dumping scoops of batter on top of each other. I used ice cream scoops with the thumb release to portion out the batter. One thing I did note is that you need to make sure your prepared pans are on a level surface or the batter will not spread evenly. Also, I used pan release in a can to grease & flour my pans and it worked like a charm!


The first batch of cakes I made I did not measure out two cups of batter to tint, I eyeballed it and as a result had too much pink and not enough white batter. You can see it in the middle layer of the finished cake. If you want perfect zebra stripes, you need to make sure your scoops hold the same amount of batter. You also need to be mindful to dump each scoop of batter in the middle of the the last scoop of batter you dumped in.


After the cakes come out of the oven, cool them for 15 minutes before removing them from the pan. Then allow them to cool on racks until they are completely cool. Wrap them well in plastic wrap and stash them in the fridge to get cold before leveling, filling and frosting.

Saturday, May 14, 2011

I'm Back & There's Going To Be Cake

Despite my best efforts, I never managed to get regular blogging back into my schedule. Recently I was tapped to make our niece's birthday cake (Pickles is turning 6!! Where does the time go?) and I thought what better way to rejuvenate this labor of love? So without further ado let's jump back in, shall we?

One of the more frequent questions I am asked is how I come up with the ideas that we eventually turn into cakes or candies. Sometimes it's because we have seen something similar in a book or blog but most of the time it's because we are given some direction by the person hosting the event. For Pickles' 6th birthday we have been provided with a napkin from the already purchased party supplies and a photograph that inspired the birthday girl's choice of theme.


Isn't it cute?

Not terrible for a grocery store cake. See the inspiration napkin in the upper left of the photo?

The hostess only had a few simple requests, no chocolate cake and she didn't want a ton of leftovers. The rest of it was up to me! So, non-chocolate cake for 20, based on the garden party theme and something a bunch of kids will love. Hmmm...

I am a very visual person and I like to have a plan. Having a plan is good because it decreases the chance that you are going to run out of ingredients (like candy melts -a hem) at 10 PM the night before the party!

The first thing I did was think about the actual cake and settled on a French Vanilla zebra cake although I haven't decided on batter colors yet. I am leaning towards hot pink! Once I had that established, I needed to figure out how much cake was needed. After scouring the internet it seemed a two-layer, 9" round would fit the bill and just because I wasn't entirely convinced I traced my 9" cake pan onto a sheet of paper (which I was going to have to do anyway) and made sure it could be cut into 20 pieces. I'll be honest, it's tight but you can cut a 9" round into 20 pieces as long as you keep them on the small side (and I don't know anyone who cuts cake into pieces that small). The more I thought about it, the more I became concerned about having enough cake because until the cakes are baked, you have no idea how much you are going to end up cutting off in the leveling process. To alleviate that problem I decided on making a three-layer cake. With that settled (and yes, baking the zebra cake will be it's own post in the coming days) it was on to design!

I already had my 9" pan traced onto a sheet of white paper so it was easy to begin visualizing the finished cake. I knew I would be using elements from the napkin on the cake The next thing I did was draw out the elements on a separate piece of paper (using the napkin as a guide for size) and cut them out. Doing this allows you to design a cake as easy as playing with Colorforms (remember those?) and in my case will eventually provide the pattern for chocolate crafting the butterfly and any other elements I choose. I'll spend the next few days working out a design so I can go shopping for ingredients and start baking on Thursday. Wish me luck!

Sunday, August 30, 2009

Boo-ter-fly Cakes


Sometimes I get myself in over my head without even trying. Such was the case with these adorable little cakes made for our little friend Boo. Exactly 7 days before her party her mother and I went over to the bookstore so I could show her Hello, Cupcake! to see if there was anything in there she liked. To my honest shock and surprise there was nothing in the book that tickled her fancy so we moved on to other books, fancier books, more complicated cakes. In the end we settled on a combination of the butterfly cupcakes from Hello, Cupcake! (with modifications) and a mini-cake from Mich Turner's book Spectacular Cakes. While the cakes would be labor intensive they weren't really all that complicated, especially if I started them three or four days before they were needed for the party. What I didn't count on was an entire week of whatever could go wrong, would go wrong (including me getting a migraine that just wouldn't quit).

The plan was that the mini cakes would be french vanilla, filled with soft pink buttercream, covered in poured fondant of pale green, striped with thin lines of pale pink and magenta buttercream and topped with a pastel colored butterfly. They needed 36 little cakes for their party. In order to ensure that I would have enough I decided to go with cupcakes thinking I would use a timbale mold/cutter to make them all uniform. Due to time constraints, I used french vanilla cake mix that I doctored up with a box of instant pudding and some vanilla extract. The cakes were soft and dense and yummy! However the timbale mold/cutter I bought was 1 size too big and I was unable to make them all completely uniform. Not a problem for cupcakes but for sure a problem when you're going to be coating them with poured fondant. Next time I will make sheet cakes and cut the cakes out to ensure uniform cylinders and save myself the headache when it comes time to coat them. The cakes looked like little light green Ring Dings (or Ding Dongs depending on where you grew up) but tasted amazing!

I used my go-to vanilla buttercream for the filling and butterfly bodies. Man I love that stuff ... it's just everything you want and need a buttercream to be. The pourable fondant however was a COMPLETE disaster! I used the recipe on the King Arthur website. Now, before I go on, I want to remind you guys of my love affair with King Arthur flour. To be fair, it's not that their recipe was a complete disaster, it was a comedy of errors and miscalculations and a migraine that set the whole thing on the road to horrible. We ended up having to scrap the Mich Turner like stripes we had planned on piping onto each cake pre-butterfly because we ran out of time and patience with this project. In the end I don't think it made that much of a difference to anyone but the two of us. Both child and mom were thrilled with the cakes and really that's all that mattered!

I had a little accident in the kitchen and I lost 1/2 a pot of liquid fondant to my kitchen floor. I also thought the original coating looked like, well, snot. It was light green and shiny and definitely had an "eeeeeeeeeeeeeeeew" factor. In the end I had to remake the fondant and add a can of ready made frosting to make it opaque (which turned out really well for my purposes) but not before I ended up with a sugar burn on the fingers of my right hand. I used a glass bowl over a pot of simmering water for the second batch and it makes the whole process so much easier as you can regulate the temp as you go. Also, the second time around we chilled and dipped the cakes instead of pouring them. I highly recommend using the dipping method! However, my partner in culinary crimes ended up with sugar burns on his palm when one of the cakes got away from him and instead of letting it fall to the floor he tried to be a hero and save it mid-fall only to have it land top down in his palm. This is not a project to try with the kids in case anyone was wondering. That being said, I have it on good authority that the cakes were a big hit with kids and kids at heart alike! Although, the kids weren't sure what to do with the wings and had to be told they could eat them!

The butterflies were the easiest part of all this and made using Merckens Rainbow Wafer Coatings (in white, pink, purple, blue, peach, yellow and light green) and a hand drawn pattern that eventually was only used as a guide. Once again my creative partner saw potential to put his own stamp on something already pretty cool and he made the wings more monarch-like by free-handing a wing extension. There are detailed directions in Hello, Cupcake! but you really don't need them (buy the book anyway, it really is cool). Just melt some coating or chocolate, draw a butterfly and fill it with a second color of coating or chocolate and then swirl. You should also know that we had to custom blend the Merckens to get these shades by mixing them with white. There are a few tricks and tips, enough so that they will be their own post in the near future.

Assembly was easy and went pretty quick. Just make sure you are not working in a hot kitchen or the wings will get too soft and give you issues. We placed each cake in a pastel cupcake liner, piped on the body and stuck the wings in place. They all sat in the fridge for almost 2 hours pre-transport to make sure the buttercream and fondant were really hard to minimize the potential for transport disaster. I made a cake taker out of a heavy duty plastic soda case topped with a cookie sheet that sat on the edge of the case and wrapped the whole thing in plastic. It worked like a charm and fit in a fridge perfectly! For display at the party I lent them my wire cupcake holder and a silver platter. With a few pretty cupcake papers and some doilies it made for a really neat display! I may try these again at some point, the original version as they were supposed to be .... maybe not. I am such a huge fan of petit fours and to me this was a great updated version of a classic little cake that time has forgotten. Hopefully next time there won't be so much other stuff going on, I won't have a migraine and they will come out as anticipated!

Monday, August 24, 2009

Princess In A Punch Cup


It's almost time for back to school around these parts but not before just one more summer birthday bash! It's a fairytale theme for one of my favorite little princesses, adorable, squishable, kissable "Boo"! Boo's fairytale comes replete with Butterfly Petit Fours (check back soon to see them in all their glory) and pink and purple princess lollies!

For the record there are not made with actual chocolate. Merckens, the white and colored disks we used to make the lollies, is confectioners coating. What's the difference? F.D.A. specifications for chocolate say it must contain chocolate liquor and cocoa butter. While the Merckens wafer coatings contain neither of these ingredients they are good, creamy and most people won't know the difference. We've worked with several flavors and colors of Merckens over the past few months and have had great success with all of them!


I can't say I would make this the first chocolate mold a beginner should attempt. Why? Because this, at minimum, is a three color lollie which means getting down your chocolate painting technique in addition to melting and pouring. We also have to play with paramount crystals because some of the colored wafers were just took thick for such detailed work. Ultimately we did not use paintbrushes to fill in the colors. My partner in crime found that wooden kabob skewers actually worked better and he was able to drop the colors exactly where he wanted. He was also steady enough that he was able to drop all the areas of color without chilling until he was ready to pour but I wouldn't recommend doing it that way. I think slow and steady will win the race for most beginners. Melt and paint or drop one color at a time in your mold then chill before you move on to the next. Also, when choosing your colors, be mindful of how they will play off each other when layered. The lollies back filled with pink left the peach/skin tone unchanged. The lollies back filled with purple made her look like she had a tan. This wasn't a huge deal for this project but I could see it easily becoming one in others.

Another tip I can offer when you are making multiples is to package as they are done. The mold we had made 6 at a time so I had set up a foam holding area/wrapping station while the first batch was in the freezer. I picked up the bags and ribbon at Eatons at the same time I got everything else we needed for this project. Each one got bagged and tied with one of two colors of ribbon and nestled into their final destination which turned out to be a few vintage punch cups I had laying around. I had some opalized basket filler that I lined the cups with, dropped in a small block of Styrofoam, wrapped the long strands of basket filler over the top to hide the foam and then arranged the lollies in the cups. Hindsight being 20/20 and of course if this weren't another party on a budget I would have purchased large bags of pastel jellybeans or M&Ms to fill the cups with before sticking the lollies in. In any event everyone seemed thrilled with the final product and Boo got to have handmade lollies at her party!