Showing posts with label cake. Show all posts

Tuesday, May 24, 2011

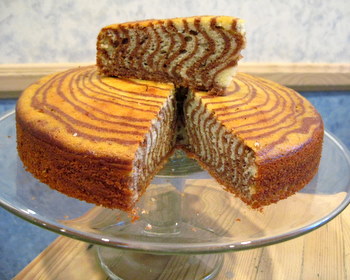
Better Late Than Never.... Pink Zebra Cke


Sometimes I use cake mix, this was one of those occasions. Since I knew I wanted a 3-layer cake, I knew I would have to bake a total of four 9" cakes. I also knew that light, fluffy, airy cake would not hold up to being stacked. So I used my tried & true doctored up cake mix cake. For each two rounds I used:

1 Duncan Hines French Vanilla Cake mix
1 4-serving Jell-O Instant French Vanilla pudding mix
4 large eggs
1/2 C vegetable oil
1 1/4 C whole milk

Follow the directions on the package to mix. Make sure you mix it on the correct speed for the amount of time called for. Once it's mixed, measure out two cups of batter in a measuring cup intended for liquid measure. Tint the 2 cups of batter whatever color you want but make it bold & bright!


I know a lot of people are confused about how to layer a zebra cake. It really is as simple as dumping scoops of batter on top of each other. I used ice cream scoops with the thumb release to portion out the batter. One thing I did note is that you need to make sure your prepared pans are on a level surface or the batter will not spread evenly. Also, I used pan release in a can to grease & flour my pans and it worked like a charm!


The first batch of cakes I made I did not measure out two cups of batter to tint, I eyeballed it and as a result had too much pink and not enough white batter. You can see it in the middle layer of the finished cake. If you want perfect zebra stripes, you need to make sure your scoops hold the same amount of batter. You also need to be mindful to dump each scoop of batter in the middle of the the last scoop of batter you dumped in.


After the cakes come out of the oven, cool them for 15 minutes before removing them from the pan. Then allow them to cool on racks until they are completely cool. Wrap them well in plastic wrap and stash them in the fridge to get cold before leveling, filling and frosting.

Saturday, May 14, 2011

I'm Back & There's Going To Be Cake

Despite my best efforts, I never managed to get regular blogging back into my schedule. Recently I was tapped to make our niece's birthday cake (Pickles is turning 6!! Where does the time go?) and I thought what better way to rejuvenate this labor of love? So without further ado let's jump back in, shall we?

One of the more frequent questions I am asked is how I come up with the ideas that we eventually turn into cakes or candies. Sometimes it's because we have seen something similar in a book or blog but most of the time it's because we are given some direction by the person hosting the event. For Pickles' 6th birthday we have been provided with a napkin from the already purchased party supplies and a photograph that inspired the birthday girl's choice of theme.


Isn't it cute?

Not terrible for a grocery store cake. See the inspiration napkin in the upper left of the photo?

The hostess only had a few simple requests, no chocolate cake and she didn't want a ton of leftovers. The rest of it was up to me! So, non-chocolate cake for 20, based on the garden party theme and something a bunch of kids will love. Hmmm...

I am a very visual person and I like to have a plan. Having a plan is good because it decreases the chance that you are going to run out of ingredients (like candy melts -a hem) at 10 PM the night before the party!

The first thing I did was think about the actual cake and settled on a French Vanilla zebra cake although I haven't decided on batter colors yet. I am leaning towards hot pink! Once I had that established, I needed to figure out how much cake was needed. After scouring the internet it seemed a two-layer, 9" round would fit the bill and just because I wasn't entirely convinced I traced my 9" cake pan onto a sheet of paper (which I was going to have to do anyway) and made sure it could be cut into 20 pieces. I'll be honest, it's tight but you can cut a 9" round into 20 pieces as long as you keep them on the small side (and I don't know anyone who cuts cake into pieces that small). The more I thought about it, the more I became concerned about having enough cake because until the cakes are baked, you have no idea how much you are going to end up cutting off in the leveling process. To alleviate that problem I decided on making a three-layer cake. With that settled (and yes, baking the zebra cake will be it's own post in the coming days) it was on to design!

I already had my 9" pan traced onto a sheet of white paper so it was easy to begin visualizing the finished cake. I knew I would be using elements from the napkin on the cake The next thing I did was draw out the elements on a separate piece of paper (using the napkin as a guide for size) and cut them out. Doing this allows you to design a cake as easy as playing with Colorforms (remember those?) and in my case will eventually provide the pattern for chocolate crafting the butterfly and any other elements I choose. I'll spend the next few days working out a design so I can go shopping for ingredients and start baking on Thursday. Wish me luck!

Saturday, April 3, 2010

Oh Carrot Where Art Thou?

I have been craving carrot cake since last summer. I have no idea why I haven’t gotten around to making one except that I always seem to baking for someone else. I adore carrot cake, moist, flavorful and another culinary excuse to have cream cheese frosting. I haven’t made carrot cake in years and for the life of me couldn’t remember my recipe so I set out with my trusty laptop to find one. Every single recipe I found contained massive amounts of white sugar, loads of oil and very little or worse yet, no actual carrot at all (baby food? Really? I didn’t even like that stuff when I was a baby, well except for blueberry buckle but that’s another story for another time). I found there are two extremes when it comes to carrot cake, uber-healthy or sugar laden and not much in between and none of it screamed decadent holiday dessert to me. I even consulted The Cake Bible I received as a birthday gift and to my utter disappointment, found Rose’s recipe using whole wheat flour to be lacking for my purposes. So the challenge had been set, I needed to put together an actual carrot cake that would make my tummy sing.

Many of the recipes I looked at were not actual carrot cakes, they were quick breads or muffins with a little bit of carrot and a ton of sugar baked in a cake pan and frosted with cream cheese icing. Carrots are naturally sweet and masking them under piles of sugar seemed wrong to me. Also, if I wanted carrot bread I would just make carrot bread. I wanted cake. Too many of the recipes called for extended mixing times AFTER the flour had been added. Hello! I want cake, not bread and over mixing causes gluten production, which makes bread.

So I started with what I knew… I knew I wanted carrot to be the star player and not merely an add-in. I knew I wanted walnuts but no raisins or coconut. I knew I didn’t want to taste vegetable oil or end up with a heavy brick that sat in my stomach hours after consuming it. I knew I wanted it moist, flavorful and decadent just like my Gram used to make. The last thing I should mention is that I ultimately decided on cupcakes instead of a 9x13 or layer cake. Why? Just cuz, that’s why. I gathered my ingredients and hit the kitchen…

You’ll notice a few things different about my version of carrot cake, most notably (I think) the absence of vanilla and a significant reduction in sugar and oil. I love vanilla. Vanilla is my friend. Vanilla has no place in this cake. Vanilla would be wasted in this cake. The cinnamon and ginger are such strong players that they would completely swallow 1 or 2 teaspoons of vanilla. Save the vanilla for the frosting. There is no white sugar in this cake. The frosting has more than enough white sugar in it to satisfy the sweetest of sweet-toothed people. I used a combination of brown sugar and unsweetened, crushed pineapple and its juice to sweeten the cake. I swapped out most of the oil for plain yogurt. Lastly, I used salted butter because that’s what most people have on hand. What did all of this produce? Actual cake. Carrot cake where you could see the carrots, walnuts and pineapple in the finished product. Cake that feels like cake in your mouth not bread. Cake that is savory and slightly sweet and yummy and a perfect vehicle for cream cheese frosting!

Carrot Cake

2 c Walnut halves and pieces or halves, your choice, toasted, cooled and chopped to size
1 lb of carrots, peeled and grated
2 ½ c AP flour, I prefer King Arthur
½ t salt
1 t baking powder
1 t baking soda
2 t cinnamon
½ t freshly rasped ginger (use 1 t if powdered)
¾ c brown sugar
½ c melted salted butter
¾ c + 2 T plain yogurt
3 eggs
8 oz crushed, unsweetened pineapple in juice, drained- reserve juice
2 T of the reserved pineapple juice
1 recipe Creamy Cheesy Cream Cheese Frosting
Pulverized, toasted walnuts for garnish optional

I started by toasting walnuts and yes, it’s worth the extra step. I had a one-pound bag of walnut halves and pieces. I toasted half of the bag on an un-greased cookie sheet in a 350* oven for 10 minutes while I peeled and grated a pound of carrots on the larger side of my box grater (yes it matters, the smaller side turns them to mush). I ran my knife through the walnuts to make them the size I wanted, which is to say in small chunks.

In a large bowl whisk together the: flour, salt, baking powder, baking soda, cinnamon and ginger. Using your hands, toss the carrots and nuts into this mixture. You really need to do this part with your hands to ensure that everything is evenly distributed and the carrots are well coated with the flour. By tossing the ingredients at this stage, you don’t end up developing gluten by over mixing once the wet ingredients are added.

In a separate bowl beat together the oil, yogurt and sugar until smooth and no traces of sugar remain. Add the eggs one at a time, beating well after each addition. Stir in the pineapple. Pour this mixture over the flour and stir just until combined. I found my mixture to be a little too thick at this point and added 2 T of the reserved pineapple juice.

I used my handy-dandy ice cream scoop to portion out the cupcakes (this recipe made 2 ½ dozen). Bake at 350* for 18 minutes, allow them to cool in the pan for a few minutes before removing them to a wire rack to cool completely. You could easily bake this in any cake pan you wish.

Creamy Cheesy Frosting*

8 oz cream cheese, room temp.
1 stick of salted butter, room temp
1 lb box Confectioner’s/10x sugar
2 t vanilla extract
1 t lemon juice

I start by creaming the cream cheese and butter together in my kitchen aid. Once they are mixed and smooth I add the sugar and flavorings. I start on the "Stir" setting so I don't get covered in powdered sugar and then kick it up to 8 and let it go for 5 minutes. Too thick? Add about a tablespoon of milk. Too thin? Pop it in the fridge a bit and it will firm up.

I used a Wilton tip for the frosting swirls and toasted, pulverized walnuts to finish them off. There are a few tips I can give you that I find help me immensely. Before I start frosting I divide the cupcakes into 2 pans that are sturdy enough to be able to carry over to the fridge. When using tips to frost I find that in addition to the soft consistency of the frosting, holding the tip directly over the cupcake and NOT at any kind of angle gave me the best look. I frosted 4 at a time and then stopped to pat on the walnuts. When one pan was done it immediately went into the fridge to firm up. Firming up the frosting BEFORE transporting is the key to your cupcakes arriving as beautiful as they were freshly frosted in your kitchen.

*Squirrely wrath!

Friday, September 4, 2009

Best Birthday Cake Evah!


It's chocolate. It's peanut butter. It's cake. What's not to love?

Chocolate, chocolate chip cake, peanut butter cream cheese frosting and chocolate peanut butter ganache! OMG! So rich. So good. Requires lots and lots of cold milk!

I can't lie ... I adapted the recipe from Smitten Kitchen. It's not as pretty as hers but damn it was goooooooooooooooooooooooood!

The changes I made were small. I used my own cake recipe and only made 2 layers. I also added a bit of salt to the filling/frosting and found that I needed to thin it with a bit of milk. The chocolate peanut butter ganache was hands down the best thing I have ever tasted!

Sunday, August 30, 2009

Boo-ter-fly Cakes


Sometimes I get myself in over my head without even trying. Such was the case with these adorable little cakes made for our little friend Boo. Exactly 7 days before her party her mother and I went over to the bookstore so I could show her Hello, Cupcake! to see if there was anything in there she liked. To my honest shock and surprise there was nothing in the book that tickled her fancy so we moved on to other books, fancier books, more complicated cakes. In the end we settled on a combination of the butterfly cupcakes from Hello, Cupcake! (with modifications) and a mini-cake from Mich Turner's book Spectacular Cakes. While the cakes would be labor intensive they weren't really all that complicated, especially if I started them three or four days before they were needed for the party. What I didn't count on was an entire week of whatever could go wrong, would go wrong (including me getting a migraine that just wouldn't quit).

The plan was that the mini cakes would be french vanilla, filled with soft pink buttercream, covered in poured fondant of pale green, striped with thin lines of pale pink and magenta buttercream and topped with a pastel colored butterfly. They needed 36 little cakes for their party. In order to ensure that I would have enough I decided to go with cupcakes thinking I would use a timbale mold/cutter to make them all uniform. Due to time constraints, I used french vanilla cake mix that I doctored up with a box of instant pudding and some vanilla extract. The cakes were soft and dense and yummy! However the timbale mold/cutter I bought was 1 size too big and I was unable to make them all completely uniform. Not a problem for cupcakes but for sure a problem when you're going to be coating them with poured fondant. Next time I will make sheet cakes and cut the cakes out to ensure uniform cylinders and save myself the headache when it comes time to coat them. The cakes looked like little light green Ring Dings (or Ding Dongs depending on where you grew up) but tasted amazing!

I used my go-to vanilla buttercream for the filling and butterfly bodies. Man I love that stuff ... it's just everything you want and need a buttercream to be. The pourable fondant however was a COMPLETE disaster! I used the recipe on the King Arthur website. Now, before I go on, I want to remind you guys of my love affair with King Arthur flour. To be fair, it's not that their recipe was a complete disaster, it was a comedy of errors and miscalculations and a migraine that set the whole thing on the road to horrible. We ended up having to scrap the Mich Turner like stripes we had planned on piping onto each cake pre-butterfly because we ran out of time and patience with this project. In the end I don't think it made that much of a difference to anyone but the two of us. Both child and mom were thrilled with the cakes and really that's all that mattered!

I had a little accident in the kitchen and I lost 1/2 a pot of liquid fondant to my kitchen floor. I also thought the original coating looked like, well, snot. It was light green and shiny and definitely had an "eeeeeeeeeeeeeeeew" factor. In the end I had to remake the fondant and add a can of ready made frosting to make it opaque (which turned out really well for my purposes) but not before I ended up with a sugar burn on the fingers of my right hand. I used a glass bowl over a pot of simmering water for the second batch and it makes the whole process so much easier as you can regulate the temp as you go. Also, the second time around we chilled and dipped the cakes instead of pouring them. I highly recommend using the dipping method! However, my partner in culinary crimes ended up with sugar burns on his palm when one of the cakes got away from him and instead of letting it fall to the floor he tried to be a hero and save it mid-fall only to have it land top down in his palm. This is not a project to try with the kids in case anyone was wondering. That being said, I have it on good authority that the cakes were a big hit with kids and kids at heart alike! Although, the kids weren't sure what to do with the wings and had to be told they could eat them!

The butterflies were the easiest part of all this and made using Merckens Rainbow Wafer Coatings (in white, pink, purple, blue, peach, yellow and light green) and a hand drawn pattern that eventually was only used as a guide. Once again my creative partner saw potential to put his own stamp on something already pretty cool and he made the wings more monarch-like by free-handing a wing extension. There are detailed directions in Hello, Cupcake! but you really don't need them (buy the book anyway, it really is cool). Just melt some coating or chocolate, draw a butterfly and fill it with a second color of coating or chocolate and then swirl. You should also know that we had to custom blend the Merckens to get these shades by mixing them with white. There are a few tricks and tips, enough so that they will be their own post in the near future.

Assembly was easy and went pretty quick. Just make sure you are not working in a hot kitchen or the wings will get too soft and give you issues. We placed each cake in a pastel cupcake liner, piped on the body and stuck the wings in place. They all sat in the fridge for almost 2 hours pre-transport to make sure the buttercream and fondant were really hard to minimize the potential for transport disaster. I made a cake taker out of a heavy duty plastic soda case topped with a cookie sheet that sat on the edge of the case and wrapped the whole thing in plastic. It worked like a charm and fit in a fridge perfectly! For display at the party I lent them my wire cupcake holder and a silver platter. With a few pretty cupcake papers and some doilies it made for a really neat display! I may try these again at some point, the original version as they were supposed to be .... maybe not. I am such a huge fan of petit fours and to me this was a great updated version of a classic little cake that time has forgotten. Hopefully next time there won't be so much other stuff going on, I won't have a migraine and they will come out as anticipated!

Saturday, August 8, 2009

Party Treats

Have you ever wanted a custom look to a party, special event or wedding you were throwing but knew you couldn't afford the custom price tag? Been to those pricey gourmet stores and seen little truffles and bags of candies at outrageous prices? What if I told you that you could make these cute little cupcake truffles (as seen with packaging) for less than $1.00 a piece? The bucket full of candy popcorn? About $2.10 per bag. Not bad for edible treats in this day and age. In fact, assuming you have a few basic kitchen tools and some of the usual suspects (butter, sugar, vanilla) on hand, there really isn't much you can't turn out of your own kitchen for less than those fancy shops charge.


The cupcake truffles are a variation of the cake-pops we made for June's Graduation BBQ and again the idea comes from Bakerella's blog. Using the same candy mold that made the base for the grad cap, two flavors of cake (left over cupcakes from the gator cake made for the same party), about a cup of cream cheese frosting, two flavors of candy melts (Merkins is my favorite) and the leftover sprinkles from the cake-pops we turned out these little cuties in no time at all. In fact, the only frustrating part was the heat and humidity the week these needed to be made. Just like last time we used the freezer to our advantage!


The candied popcorn idea came from one of my favorite blogs Saucy's Sprinkles! It's candied popcorn flavored with Kool-Aid! In this case we used pink lemonade and black cherry. It's colored with the same Wilton gels you use to tint frosting and friends it's good. I mean crazy good. I mean crack-like addictive good! It's sweet and buttery and "omnomnom" is the only thing you really hear when people get their hands on it. A candy thermometer is a must for this because unlike other kinds of candied popcorn this does not get baked to set the coating! Here's a few tips if you decide to try your hand at candied popcorn:

* 1/2 cup kernels = 12 cups popped corn
* have a partner when you make this, 2 sets of hands are infinitely better than 1
* butter/otherwise grease the pan you are going to mix the coating with the popcorn in and the mixing utensils for easier cleanup
* don't try to make this when it's humid
* a lidded bowl or other food-safe container is perfect for mixing two flavors together and breaking up any large chunks of popcorn that stick together

Sunday, August 2, 2009

Hello, Cupcake! A Review and Project Test

Our little friend Emmy had a birthday this past week and it was her wish that she get a crocodile cake for her big party. As it turned out the book Hello, Cupcake! (by Karen Tack and Alan Richardson), which I've been wanted to check out for a while now, had instructions on how to make such a marvelous creature. As you can see we (we being myself and my wonderful, never used a piping bag before partner in confectionery crime) were able to turn out an end product that look pretty close to the photo in the book!

Hello, Cupcake! is an excellent resource for any baker's personal library and well worth the modest price tag! The bigger bonus is that you honestly do not need baking, cooking or decorator skills or any special equipment to turn out end products that look like the creations from the book. While I disagree with the authors on both the subject of cake and frosting (which I'll get to in a minute), I couldn't help but get lost in all the wonderful photographs and easy to follow directions. The cookies and candies that make up each project are readily available at more than one retail outlet in my area. In fact the only things I was unable to find for my project were white cupcake liners (my supplier was out) and green jelly beans (because I was unwilling to pay $4.50 for a bag when I only needed 2 beans).

"Old Swampy" as we made him consisted of 12 Chocolate Buttermilk cupcakes and 12 Buttermilk French Vanilla cupcakes tinted pink (to please the Birthday Girl) with Wilton "Rose" colored gel. He is frosted in homemade vanilla buttercream tinted with a mixture of Wilton "Leaf Green" and "Brown" gel tints. I followed the cake instructions in the back of Hello, Cupcake! and was very disappointed with the cakes themselves finding them a bit dry, bland in flavor and not at all as solid as the book suggests they will be. For future Hello, Cupcake! projects I will be sticking with my own tried and true cake recipes that have stood the test of time as being moist, dense and full of flavor. Hello, Cupcake! also claims that canned frosting works best for their projects however my own vanilla buttercream frosting pipes well and when refrigerated holds its shape even in the heat of an outdoor party (unlike canned frosting which gets drippy when it gets too warm)!

One of the other benefits of using my homemade frosting is that you can make up to 2 days before you plan on eating the end product and it actually improves the flavor! It's super easy to make and lends itself to an infinite variety of flavor possibilities!

Vanilla Buttercream Frosting

1 stick room temperature salted butter
2 1/2 C confectioner's sugar
2 t milk + a little more
1 t vanilla
1 t freshly squeezed lemon juice

Put all of the ingredients in a bowl and mix on low until blended then kick it up to high and let it go for 3 minutes adding more milk if necessary for thinning. Store in an airtight container for up to 48 hours prior to use. Holds well in the fridge for the life of the finished cake product (they never seem to be around for more than a few days here!)

Sunday, June 28, 2009

Graduation Cake Pops

I first saw these on Bakerella's blog and thought "how cute are these!?!" By the time we were done making and bagging them I was thinking "what a giant PITA!!!" I'm sure I was thinking that only because of all the things that went wrong this being the first time making them and the fact that we ended up with 76 finished pops! What went wrong? We didn't have enough white chocolate coating, I didn't like the cake, it was a humid night and it took about seven hours to make these from start to finish. The process is relatively simple and Bakerella does a great job explaining the steps on her blog. Bake cake, crumble cake, mix with frosting, form, stick, chill, dip/pour and decorate. And while the process itself may be relatively simple getting these to look and taste the way you want them to is not and they are super time consuming if you are going to make more than a dozen.

Here is the exact list of what we used to make the pop and display:

1 9x13 cake -flavor of your choice
1 can of cake frosting in a complimentary flavor
your largest mixing bowl
medium peanut butter cup mold
square thin mint style candy mold
3.25 lbs of white melting chocolate

measuring spoons in 1/2 and 1 teaspoon
lollipop sticks
wax paper
2 standard cookie sheets
2 blocks of Styrofoam
2 cup liquid measuring cup -microwave safe
2 Wilton squeeze bottles
Wilton purple sugar sprinkles


Wilton Heart Drops
grape licorice rope
Airheads bars in White Mystery
pair of scissors
curling ribbon
cello bags
xacto knife
large, painted terracotta pot
shiny, opalized basket filler


Don't bother using anything other than "candy melts", "melting chocolate" or "candy coating" (these are the different names I have seen it go by) for these unless you are schooled in the ways of tempering chocolate. We ran out of "candy melts" and given the hour the only thing we could get our hands on was Lindt white chocolate. I made the mistake of not re-tempering it and not only did it lose its snap and shine but it just did not hold up as well as the "candy melts" the day of the event. Truth be told, I actually preferred the taste of the Merkens than the Lindt for this project but then again I have never been a huge Lindt fan. Also, do yourself a favor and clear out enough space in your freezer to hold the cookie sheet(s) and candy molds. Using the freezer speeds up the set up time and when you're doing this in warmer weather makes it a lot less frustrating.

Let's talk about cake because without the cake, these are just regular old white chocolate lollies. Due to budgetary and time concerns we used a Pillsbury Strawberry cake mix. BIG MISTAKE! First of all, while it may have smelled (to some people, people with stuffy noses) like strawberry it in no way tasted like it. Also, the color was not the bright pink I would associate with strawberry cake. While I did my thing to dress it up (butter instead of oil, hot pink food tint) I just didn't like it. Plus and this is a big plus, the texture was all wrong for this project. You don't want a light, fluffy cake for this you want a dense, moist, heavy cake. I would suggest baking the cake in a loaf pan (or two) ( even if you need as much cake as we did) and baking it at least a day ahead. I think traditional Pound Cake would work awesome for these.

The freezer was so our friend the night we made these! I made the call to deviate from Bakerella's directions and stick these BEFORE we placed them in the peanut butter cup mold and I'm glad we did. Having these little cuties all sticked up made it easier for the person pouring the molds to just plop them right in and move on to the next instead of having to fiddle with getting them just right. Each one used about 1/2 teaspoon of the cake/frosting mixture and even then some of them pushed through the top of the mold (which was okay since it was covered with a square of chocolate.) Here they are all lined up and ready for the freezer where they sat for about two hours in our process (since we ran out of chocolate.) For the plain round ones I would suggest using no more than 2 teaspoons of cake/frosting. The larger ones we made, about a tablespoon of cake, were just too big/heavy to hold up especially once they got warm!

I am really grateful I wasn't making these alone! Those freaking tassels (made from licorice rope and air heads cut and twisted together) would have been the death of me! The Styrofoam blocks were well used both while making the pops and then again when it came time to create the displays. We were able to stage the pops (I think) eight at a time and having a place to stick them upright was helpful for packaging them too! As long as you shoved the stick in deep enough it was stable enough to move them around in case they needed to get popped back in the fridge, which they did. In the end I think these are TOTALLY worth all the hard work that went into them and they seemed to big hit at the BBQ!